Learn how to make a stomp rocket and launcher using cheap items you may already have on hand. This STEM activity is a fun way to inspire critical thinking among children.
Paper Stomp Rocket Supplies
- Empty 2 lt bottle
- Bike tire
- 2 hose clamps
- 5 – 2 foot 1” diameter PVC tube
- Scissors
- Flathead screwdriver
- Tornado tube (optional)
- Paper (printer, construction, cardstock, etc)
- Ruler
- Tape
- Pencil, markers, crayons, etc.
- Printable Fin and cone Template
How to Make a Paper Stomp Rocket Intro
Have you ever partially unwrapped a straw and left part of the wrapper it. What happens to the paper when you blow through the straw? The wrapper goes flying. This STEM activity uses the same concept of air pressure but on a much larger scale.
Kids will design, develop and engineer stomp rockets that will fly into the air using the power of air.This fun and engaging STEM activity for kids is something they will talk about for years. Get kids thinking outside of the box while they build and launch paper rockets.
Setup – Build the Launcher
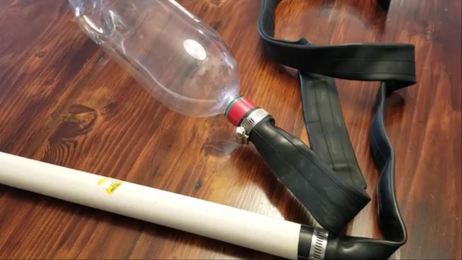
- Cut the bike inner tube by the valve. Then, cut again on the other side of the valve so you have one long rubber hose.
- Stretch the tube over one of the PVC pipes so that it covers about an inch of the pipe. Slide the hose clamps onto the pipe and use the flat head screwdriver to tighten it. Tighten it until it is on securely
- Slide the other hose clamp onto the rubber tube. Place the open end of the tube around the mouth of the 2 liter bottle. Slide the hose clamp down around the rubber tube and mouth of the bottle. Tighten the clamp using the flat head screwdriver. I do recommend a tornado tube to make this step easier, but it is not necessary. A tornado tube is a small piece that allows you to screw a 2 liter bottle directly into it I found one cheap on amazon. (Click here to see the current price) Baring their are no holes or leaks in your launchers you are ready to build.
Steps to Make a Paper Stomp Rocket
Step 1: Rocket Body
Take one of the 2 foot 1” diameter PVC pipes and a piece of paper. For this part of the ship I prefer to use printer paper, it’s easier to work with and lightweight. However I have seen kids make some amazing rockets with both construction paper and card stock.
Wrap the paper around the plastic tube. If you use the paper the tall way your rocket will be taller, If you use the paper the long way it will be shorter. I can not say if one way works better than the other I have seen success with both approaches.
You want the paper to wrap around the tube only once. Cut off the excess paper. Then, wrap the paper around the pipe again. Using tape, secure the paper around the tube. You want it to to tight against the tube but not so tight that it can not move. Make sure to tape the entire length of the paper so no air will come through the side.
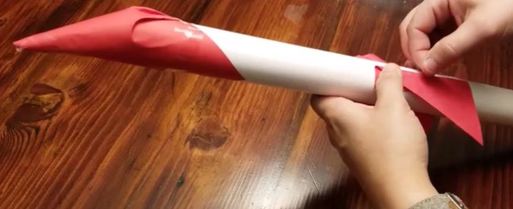
Step 2: Rocket Top
To create the rocket top start with a quarter sheet of paper. Curl the paper into a cone and tape it together. With the body of the rocket still on the PVC pipe place the cone on the top. The PVC pipe gives the rocket stability as you tape the cone on. Then wrap the tape around the base of the cone and the top of the body making sure there are no holes. In this step tape is your best tool. Wrap it around at least three times.
Test the cone. Take the body off of the tube and blow into it. Put one hand at the nose of the rocket and feel for any air coming through. If you feel air your paper rocket will not fly. You need more tape. Keep testing until you can not feel air coming through the rocket.
Step 3: Fins
Decide on the number of fins your rocket will need, and what shape the fins will be. You can print the fin template to help or create your own fin shape. Some paper rocket engineers prefer three fins, some prefer four I have even seen a paper rocket with six fins.
The shape of the fin can range from a perfect triangle, to oblong triangles to rectangles. After you decide on the number and shape of your fins draw one on a piece of paper. Then measure ½ inch from what will be the interior edge and extended the fin drawing. This extended part of the fin will be used to attach the fin to the rocket. Cut out the fin making sure to cut out the extended part of the fin as well. After you have cut out one use it as a template to create your remaining fins.
Attach the fins. Pick up the fin you used as a template and fold it along the original fin line and the ½ inch excess line. Do the same with the remaining fins. Place the rocket body back onto the PVC pipe. Hold the first fin up to the rocket in place where you would like it. Use tape to secure the fin to the body. Repeat with the remaining fins. Keep in mind that you want the fins to be spaced evenly around the rocket.
The engineering of your paper rocket is complete. You may now color or personalize your rocket as you would like.
The Launch the Rocket
Take your launcher and paper rockets to a large open space. Either an indoor gym or outdoor park work well. Slide the first rocket on to the PVC tube of the launcher. Count down 3-2-1 on one have the rocket engineer jump on the bottle end of the launcher. If there are no holes in the paper rocket it will fly into the air!
Blow up the launcher back up by blowing into the PVC tube until the bottle inflates again. Have the next kid give it a go. After the initial launch ask kids what changes they think they could make to have their rocket go further. Have them make some changes and try it again.
You may want a few extra 2 liter bottles on hand, if you get a good jump the bottles can blow out then you need to replace it.
More Engineering Activities
Now that you know how to make a stomp rocket you may enjoy tinfoil boat engineering. Use tinfoil and other supplies to make a boat that floats and can hold 100 pennies!
You may also like the helium balloon hover challenge. Can you make a helium balloon hover without touching the ceiling or the floor?

Pingback: 5 unexpected Tornado Tube activities for Kids - That After School Life
Pingback: 18 Family Night Ideas for After School Programs - That After School Life